|
P70, P75
To service a computer with an active, unknown, power-on password do the following.
1. Power-off the computer and unplug the power cord.
2. Remove the system-unit cover.
3. Short the two pins 1 together.
4. With the pins shorted, power-on the computer. This erases the power-on password.
5. Remove the short after POST is finished.
N45SL
To service a computer with an active, unknown, power-on password, do the following.
1. Power-off the computer and unplug the power cord.
2. Remove the battery pack.
3. Remove the math coprocessor access panel.
4. Locate the two override pins on opposite sides of the socket.
5. Install a jumper wire between the pins.
6. Install the battery pack.
7. Power-on the computer and leave it on until the LEDs blink and the computer locks up.
8. Remove the jumper wire.
9. Press and hold the lid switch, then power-on the computer.
N51xx
1. Power-off the computer and unplug the power cord.
2. Remove the bottom cover and the battery pack.
3. Locate the override connector on the system board.
4. Install a jumper over the pins 1.
5. Power-on the computer to erase the password.
6. After POST completes, remove the jumper. Otherwise power-on password will not be reset.
ThinkPad 240 [2609]
Short the jumper JP1
Thinkpad 310/310D/310E/310ED [2600]
Use switch SW2 near CPU socket (second bit switch couting from the lowest side)
ThinkPad ??? [2610]
ThinkPad 365C 365CD 365CS 365CSD 365E and 365ED [2625]
The following procedure disables user and supervisor passwords.
1. Power-off the computer.
2. Disconnect the AC Adapter.
3. Open the keyboard and remove the battery pack.
4. Remove the Mylar cover. See FRU Removals and Replacements
5. Locate the S2 switch block on the system board.
6. Set Switch 1 to Off.
7. Wait 30 seconds.
8. Set Switch 1 to On.
9. Replace the Mylar cover.
10. Replace the battery.
11. Connect the AC Adapter.
12. Power-on the computer.
13. Go to a DOS full screen.
14. Press Ctrl+Alt+F11 to access the setup screen and reset the passwords.
ThinkPad 355x [2619]
ThinkPad 360x [2620]
ThinkPad 370C, 750x, 755C, 755CS [9545]
How to Disable the Power-On Password:
1. Power-off the computer.
2. Open the keyboard and remove the battery pack and the diskette drive.
3. Remove the attachment holder.
For Models 355x and 360x, see >> '1115 Standby Battery'
For Models 370C, 750x, 755C, and 755Cs, see >> '2105 Standby Battery'
4. Install a jumper on the power-on password connector -1- at bottom left side of the
system board.
5. Reinstall the diskette drive and the battery pack.
6. Power-on the computer and wait until the POST ends.
7. Verify that the password prompt does not appear.
8. After the service check is completed, remove the jumper.
Thinkpad 710T [2523]
To disable the power-on password:
1. Power-off the computer.
2. Remove the backup battery cover.
3. Locate the security switch beside the backup battery.
4. Move the slide switch to the opposite side.
5. Power-on the computer.
Thinkpad 730TE [2524]
Use the following procedure to disable the power-on password if needed.
1. Power off the system.
2. Remove the Pen Compartment Cover and the Sub Battery cover.
3. Identify the security pin wich is located beside the sub battery.
4. Power on the system while making a short-circuit between the two security pins with a
regular screwdriver's flat tip.
Thinkpad ??? [9546, 9547]
1. Power-off the computer.
2. Open the keyboard, and remove the diskette drive or CD-ROM drive and the battery pack.
3. Install a jumper on the power-on password connector on the left side of the FDD
connector.
(See 'Password Connector' for location.)
4. Reinstall the battery pack and the diskette drive/CD-ROM drive.
5. Power-on the computer and wait until the POST ends.
6. Verify that the password prompt does not appear.
7. After the service check is completed, remove the jumper.
Thinkpad 300 [2615]
To override a password , do the following.
1. Power-off the computer.
2. Remove the access panel.
3. Remove the battery pack.
4. Remove the top assembly (do not disconnect any cables).
5. Connect a jumper to the two pads (R39) at the side of the math coprocessor socket.
6. Reinstall the battery pack.
7. Power-on the computer. Keep the computer on until the LEDs blink and the system locks.
8. Remove the jumper.
9. Press and hold the reset switch, then power-on the computer.
10. Power-off the computer.
11. Replace the top assembly and the access panel.
Thinkpad 350, PS/Note 425 [2618]
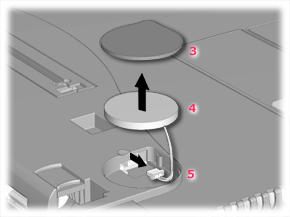
Remove the cmos battery 5 minutes
Thinkpad 365X, 365XD [2625]
1. Power off the computer.
2. Open the keyboard and lift the right-most section of the insulator sheet.
3. Push out the small door on the right side of the base cover.
4. Apply a short across the Power-On Password Jumper Pads.
5. With the jumper tool in place, power on the computer to clear the password.
6. Remove the jumper and power off the computer.
7. Power on the computer and verify that the password has been cleared.
Thinkpad 380-385 [2635]
1. Power off the computer.
2. Turn the computer upside down, loosen the DIMM cover screw, remove the DIMM cover.
3. Then power-on the computer by applying a short across the power-on password jumper pads
315
Thinkpad 380XD, 385XD, 380Z [2635]
A. Power off the computer.
B. Turn the computer upside down, loosen the memory-slot cover screw, and remove the
memory-slot cover.
C. Short across the power-on password jumper pads
D. Power on the computer and wait until the POST ends.
E. Reinstall the memory-slot cover, and turn the computer right side up.
ThinkPad i-Series 1400 [2611]
1. Turn off the computer.
2. Unplug the AC Adapter and remove the battery.
3. Remove the keyboard and the thermal plate.
4. Move the password switch (SW2, switch 2) from OFF to ON to bypass the password.
Note: SW2 has four switches, the second upper switch (switch 2) is the password
bypass/check switch.
Turning the switch to the left (ON position) is "bypass password", the right
(OFF position) is "check password".
5. Plug in the AC adapter and turn on the system.
6. While the ThinkPad logo is being displayed, wait for a beep before pressing F1 to enter
the BIOS Utility.
7. Select "System Security" from the BIOS Utility main menu and press Enter.
8. Set the "Power-On Password" setting to "None" to clear the
password.
9. Save and exit the BIOS Utility.
10. Turn off the system and unplug the AC Adapter.
11. Move the password switch from ON to OFF to enable the password function.
12. Reinstall the thermal plate and keyboard.
13. Reinstall the battery pack and plug in the AC Adapter.
ThinkPad i-Series 1400/1500 [2621]
If only the power-on pasword is set, do the following to remove it:
1. Power off the computer.
2. Remove the battery and the AC Adapter.
3. Remove the backup battery (RTC) 20 minutes or use the screw driver to touch the backup
battery (RTC) 1 sec.
4. Put back the backup battery (RTC).
5. Power on the computer and wait until the POST ends.
6. Verify that the password prompt does not appear.
Thinkpad 390/i Series 1700 [2626, 2627]
Thinkpad 390E [2626]
Thinkpad 390X / i 1700 [2624, 2627]
A. Power off the computer.
B. Remove the battery pack and AC Adapter.
C. Remove the backup battery (RTC) for 20 minutes or use a screwdriver to touch the backup
battery (RTC) for 1 second.
D. Put back the backup battery (RTC).
E. Power on the computer and wait until POST ends.
F. Verify that the password prompt does not appear.
ThinkPad 500 [2603]
1. Power-off the computer.
2. Disconnect all cables attached to the computer.
3. Remove the memory card access panel and memory card (if installed).
4. Power-on the computer.
5. Locate the two pins labeled PAD1-2 on the system board (in the memory card access
area).
6. Short the two pins together.
7. Press Ctrl+Alt+F3 to access the System Parameters Setup Menu.
8. Press Esc.
9. Press F5 to reset the parameter to their default values.
10. The System Time, System Date, and Password (if required) parameters need to be set
manually.
11. Press Esc, then F4 to save the values, exit the Setup program, and reboot the
computer.
12. If a memory card was removed, power-off the computer and install the memory card.
13. Install the memory card access panel.
ThinkPad 510 [2604]
1. Power-off the computer.
2. Disconnect all cables attached to the computer.
3. Remove the memory card access panel and DRAM card (if installed).
4. Power-on the computer.
5. Locate the two pins labeled PAD1-2 on the system board (see 'System Board Connectors').
6. Short the two pins together.
7. Press Ctrl+Alt+F3 to access the System Parameters Setup Menu.
8. Press Esc.
9. Press F5 to reset the parameter to their default values.
10. The System Time, System Date, and Password (if required) parameters need to be set
manually.
11. Press Esc, then F4 to save the values, exit the Setup program, and reboot the
computer.
12. If a DRAM card was removed, power-off the computer and install the DRAM card.
13. Install the memory card access panel.
ThinkPad 560, 560E [2640]
1. Power off the computer
2. Remove the frame
3. Flip the keyboard over as shown in the figure
4. Jumper the two password jumper pads (R364 or R39) located on the system board
5. Power on the computer to clear the password
6. Replace the keyboard and the frame
When replacing the frame, make sure that the frame fits correctly in place.
If it is not in place, the click buttons of the TrackPoint III cannot be pressed.
7. Replace the screws
8. Power on the computer and wait until the POST ends
9. Verify that the password prompt does not appear.
The hard disk password is stored on the hard disk.
ThinkPad 560x [2640-560 - 60x, 70x]
1. Power off the computer
2. Remove the frame
3. Position the keyboard over as shown in the figure
4. Jumper the two password jumper pads (BIT-X) on the system board
5. Power on the computer to clear the password
6. Replace the keyboard and the frame
When replacing the frame, make sure that the frame fits correctly in place.
If it is not in place, the click buttons of the TrackPoint III will not work.
7. Replace the screws.
8. Power on the computer and wait until the POST ends.
9. Verify that the password prompt does not appear
ThinkPad 560Z [2640]
1. Power off the computer.
2. Turn the computer upside down.
3. Loosen the DIMM socket lid screw -1- , and remove the DIMM socket lid.
4. Short the power-on password jumper pads (R522).
5. Power on the computer and wait until the POST ends. The password is cleared.
6. Reinstall the DIMM socket lid, and turn the computer right side up.
7. Verify that the password promp does not appear.
8. To reactivate the password, set the password again.
ThinkPad 570 [2644]
1. Power off the computer.
2. Remove the DIMM cover on the bottom side of the computer.
3. Short-circuit the two password pads.
4. Under the short-circuit condition, power on the computer and wait until the POST ends.
After the POST ends, the password prompt does not appear. The power-on password is
removed.
5. Reinstall the DIMM cover.
Thinkpad 765D [9546]
Thinkpad 765L [9547]
1. Power off the computer.
2. Open the keyboard, and remove the battery pack and the diskette or CD-ROM drive.
3. Instal a jumper on the power-on Password connector on the left side of the FDD
connector.
4. Reinstall the battery pack and the diskette drive/CD-ROM drive.
5. Power on the computer and wait until POST ends.
6. Verify that the password prompt does not appear.
7. After the service check is completed, remove the jumper.
Thinkpad 770 [9548/49]
1. Power off the computer.
2. Remove the DIMM cover.
3. Short-circuit the two password pads or put the jumper (pads near the top of the cover).
4. Under the short-circuit condition, power on the computer and wait until POST ends.
After the POST ends, the password prompt does not appear. The power-on password is
removed.
If a jumper has been used for short the password pads, then remove the jumper.
5. Reinstall the DIMM cover. |